How to manage several client brands in SSS Social as an agency
Published · 3 min read
Agencies run SSS Social with one workspace per client: each client’s social accounts, calendar, website and posts stay separate, you switch between them from the workspace menu, and one package covers every workspace you own.
This article sets up that structure, adds your team, and shows where approvals fit in.
Watch the walkthrough
Before you start
- A paid package if teammates will work alongside you — the free package is a single seat. Check how many workspaces each package includes on the pricing page.
- Access to each client’s accounts: for a Facebook Page, a role on the Page that lets you manage it.
- A list of your clients and who on your team works on each.
Step by step
Step 1: Create a workspace per client
Create one workspace for each client brand and name it after the client. Everything inside — accounts, posts, calendar, website, team — stays with that client.
Step 2: Connect the client’s accounts
Inside each workspace, open Accounts and connect that client’s Facebook Page, Instagram, TikTok and YouTube — see how to connect social accounts.
 Accounts — every connected platform, with its own Connect or Disconnect button.
Step 3: Label accounts on the Clients page
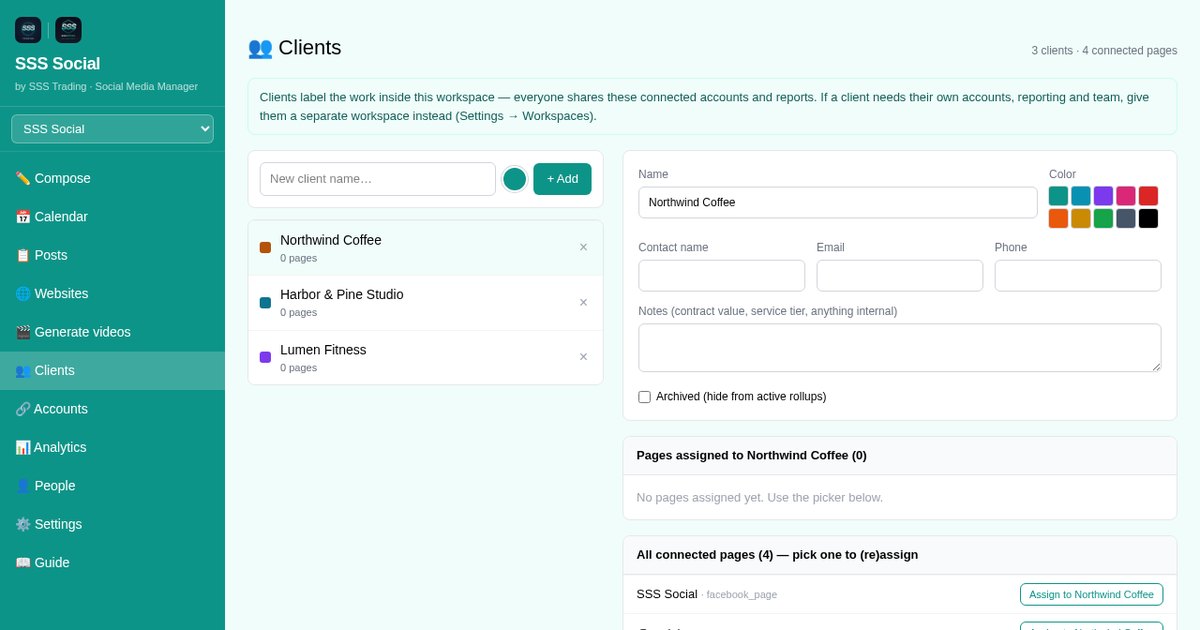
Inside a workspace, open Clients to create colour-coded client labels — with a contact name and internal notes such as the service tier — and assign each connected account to one. It makes whose page is whose obvious, which helps when one workspace holds several sub-brands.
Step 4: Bring in your team
Open People in each workspace and invite the teammates who work on that client, with a role — admin, manager, editor or reviewer — or a custom set of permissions. Each person joins with their own SSS account.
 People — where teammates are invited and given a role.
Step 5: Use approvals for sign-off
Posts from anyone without publish permission wait until a teammate who can publish approves them. Posts made from a client’s website can also be set to wait for review instead of going out by themselves.
Step 6: Plan each client’s month
Switch to a client’s workspace and use its own Calendar and Posts page, so one client’s schedule never mixes with another’s.
Step 7: Keep an eye on the package
Package limits are shared across every workspace you own, so one package covers all your clients. Your usage is under Settings.
Tips
- Each workspace follows one website, so a client’s blog or shop belongs in that client’s workspace.
- Save each client’s recurring formats as templates and their hashtags as hashtag groups.
- Give clients who sign off on posts the reviewer role rather than a full login.
Frequently asked questions
Does each client need its own SSS Social package?
No. Limits are per person and shared across every workspace you own, so one package covers all your clients. Choose a package whose workspace count fits your client list.
Can my client log in to see their posts?
Yes, on a paid package. Invite them under People in their workspace with the role you choose. They need their own SSS account and only see the workspaces they are invited to.
What happens to client workspaces if my package ends?
Nothing is deleted. Workspaces beyond what the free package covers are locked, with everything in them kept, until a package covers them again.
The illustrated version is section 9 of the guide: Run client brands (agencies).
Get started
Create a free account and set up your first client workspace today.
Create your free account
SSS Social is operated by SSS Trading. Contact: admin@ssstrading.site